Venice Carnival #5: Who's there?
Meet Giulia, our model for two afternoons during the Venice Carnival Photo Tour. This is an image that came to my mind after spending some time with her on the first day. I had an idea for something dramatic and moody. My original idea was to shoot this at the steps of the church we were aiming to go to on the second day, but we never made it there as we found a better, and less crowded location on the way. Nevertheless I wanted to try this.Of course, it is one thing to think about what you want to do, and it is an entirely different matter to actually get it done. This is where the amazing Bobbi Lane stepped in and showed me how to realize the vision in my head. I learned a lot from this shoot, and I would like to share it with you. A sort of behind the scenes kinda thing.In my head I knew that I wanted to simulate the night. I also knew I wanted the shape of the model and the direction of the light to cast some strong shadows. So while I waited for Giulia (I hope I'm spelling her name right...) I first tried to figure out my ambient exposure. I first put the camera on Manual mode and the shot above was what the camera determined as the "correct" exposure. Since I wanted night, I then dropped by shutter speed down to 1/160th to arrive at the image result below.
 I knew that I would control my flash exposure with my f-stop choice and possibly power levels on the flashes, so ambient exposure was all that I was looking for. Then I waited a bit more, as Bobbi, David and Fabio were helping other students with the model, as you can see below:
 The photo also shows what will become the main light in my setup. A regular flash (nikon) with an ExpoImaging Flash Bender, triggered by Pocket Wizards.While the model warmed up, Bobbi started to help me figure out how we should light what I had in mind. I of course was totally off. I originally thought that I had to light the model from the front, with another light from the right as an accent. Bobbi suggested a different approach. A main light (with the Flash Bender) and a flash with a grid for accent. The image below shows approximately what the lighting setup was like.
 We had two voice activated light stands, Bobbi herself on camera left with the grid spot, and Rick on camera right with the main light. The grid spot was low on the ground and coming up to add fill and separation, and the main light was above and behind the model. Each flash was around 1/4 power.The grid spot was a really great idea. It's barely noticeable in the final shot, at least you think it is. Take a look at the image below, where only the grid stop was fired:
 To demonstrate why this particular setup worked, Bobbi had me put the main light where I first thought it should go, and as you can see below and knowing what the final shot looks like, you too can see why it doesn't work.
 The drama and mystery are gone. No hard shadows, bright background, no direction, no mood. From here, we went back to the final light setup, and then worked on getting the composition right and getting the model to give me the right expression. Essentially, I worked at getting the shot. We also had to make sure to keep the flash bender away from the wall, to avoid spilling light onto it.Now in terms of processing. I did a first pass using only Lightroom while still in Venice for use in the critique, as I did not have a lot of time. It got the point across.
 I actually quite like it, but I also knew that it was just a starting point.The final image that you see at the top of the post, went through the following stages:
 Oops, there is a hand sticking out :) I didn't worry about it. I wanted to use this shot, as I thought it was the best of the bunch I took, given composition and the expression.In Lightroom, I used the camera correction tools to get rid of the barrel distortion of the 24-70mm at 24mm, and I made the exposure slightly brighter, decreased the blacks, and set the temperature to Flash. Which ended up with the image below, just before it went into Photoshop:
 In Photoshop, and guided by my first version done in Lightroom, I proceeded to darken the background while avoiding darkening the model. I did this by using two curves adjustment layers, with a gradient on each layer to mask out the curves effect. One adjustment layer on each side of the model was used. I then added an overall contrast curve to pop-out the subject and further darken the background. I then lowered the background a tiny bit more, and masked the effect out from the model by using a very soft brush.From here, I then toned the image with curves. I increased the shadows in the Blue curve, and decreased the highlights in the blue curve as well. This has the blue/yellow effect in the overall image. What David said in the workshop and elsewhere about curves being almost the only tool you ever need is true. Once you get it you can do almost anything you want.I still had to deal with the hand and flash peeking out. I tried cloning it, but it looked pretty bad, so i thought I could get rid of it by using a vignet. Which is what I did. The image went once again back into Lightroom as I really like the vignetting tools build into it, and I was also going to crop it there. I tend to find the cropping tool in Lightroom to be pretty handy and easier to use then the Photoshop crop tool and, it's non destructive. Which means that I always have the option later of changing the crop if I need or want to. Here's what the image looked like before the final Lightroom adjustments:
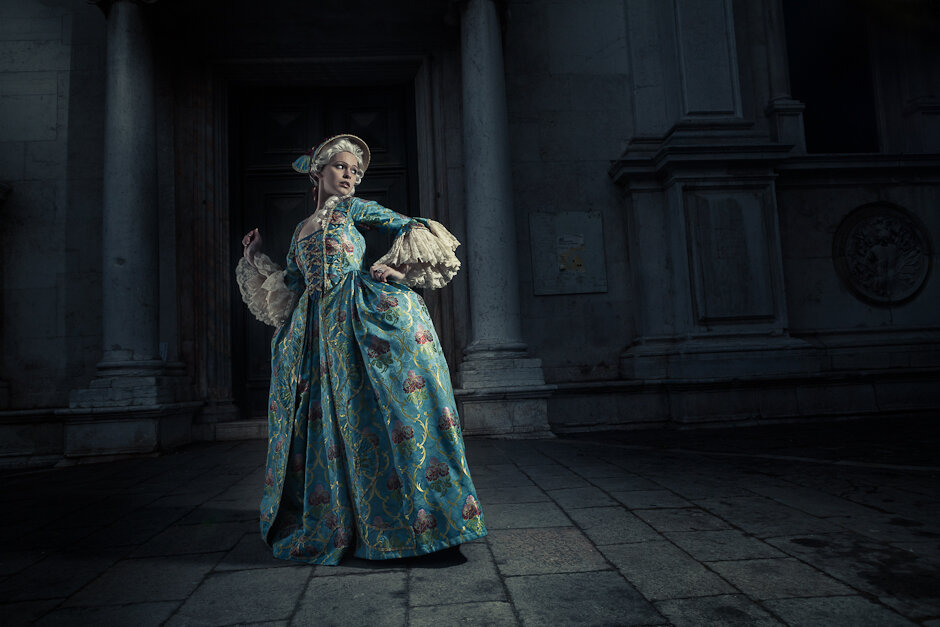
 I did intend to crop it to 16x9 just like my first take on it, but I felt that without the crop the image just breathes more. So, I ended up not cropping, and applying a vignet and an adjustment brush on the corner to "remove" the hand and flash.I hope you enjoy the final image, and the process to get to it. I learned quite a bit, and thought it would be a good idea to share it. Many thanks to Bobbi for her knowledge and help to make this vision come to realization. Thanks as well to Rick for helping with the main light, and of course Giulia. Here's the final image once again:
 Let me know what you think.